
Larry East, W1HUE
Tucson, Arizona
(contact author)
This article appeared in the January 1995 issue of The QRP Quarterly.
After several months of procrastination, I finally ordered an OHR WM-1
QRP Wattmeter kit (the fact it was on sale helped!). It went together like a
breeze; now I don't have to use a DVM, RF probe and calculator to
determine the output power of my QRP rigs! In case you are not familiar
with this great little gadget, it is a direct reading Wattmeter available
as either a kit or fully assembled from Oak Hills Research (and some
dealers). It has three power ranges: 100 milliwatts, 1 Watt and 10Watts
full scale – perfect for QRP work! My one complaint; it does not have a
"peak" mode for use with SSB. (Well, none my other Watt/SWR meters do
either, for that mater.) Noting that there was an unused operational
amplifier (U2B) available in the WM1, It occurred to me that it should be
possible to use it to implement a "peak reading" circuit.
After some experimenting, I came up with the simple modification shown in Figure 1. The circuit works as follows: The DC output of U2A charges a capacitor through a 1N34A diode, and U2B is now used as a high input impedance voltage follower. A one megohm resistor supplies the (primary) discharge path for the capacitor. The discharge path is to the output of U2A rather than ground so that the voltage drop across the diode (only a few millivolts when the capacitor is filly charged) will not affect the final output of U2B. A SPDT switch connects the meter to the output of U2A for "normal" power readings, or to the output of U2B for "peak" power readings. In the "peak" mode, the meter will follow the peak average power over short time intervals and slowly return to zero when the source of RF is removed. The "averaging" time is determined by a variety of factors; the mechanical characteristics of the meter, the resistance of the diode and output impedance of U2A (both nonlinear functions of current) and the RC time constant at the input of U2B. The time for the meter reading to return to zero is determined by the RC time constant of the 4.7µF capacitor and one megohm resistor at the input of U2B.
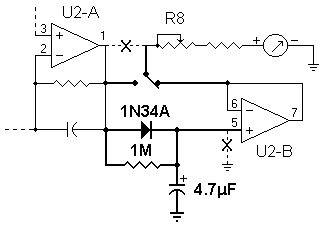
Figure 1. Modified output circuit. Added components and wiring are shown in bold.
The ability of the meter to indicate "peak average power" is heavily influenced by the value of the storage capacitor at the input of U2B. In order to determine the proper capacitance, I ran a series of tests by recording short one syllable words and playing them back through the microphone input of my TenTec 505 connected to a 52A dummy load through the WM1. A calibrated oscilloscope was used to monitor the transmitter output. I adjusted the recorder playback level so that the WM-1 read three Watts output in "peak" mode with a storage capacitor value of 4.7µF. The 'scope indicated a maximum peak-to-peak RF voltage of approximately 36V, corresponding to a peak power level of approximately three Watts [Power=(Vpp)2/(8R)]. I then used clip leads to connect various other capacitors to determine the effect on the meter reading. Typical test results are shown in Figure 2. These tests indicated that at least 3µF is required for the meter to properly indicate SSB "peak" power. For values greater than 10µF the meter reading actually decreased slightly, probably due to the RC time constant of the diode series resistance and the storage capacitor. I settled on a capacitor value of 4.7µF, but any value in the range 3.3 - 6.8µF will work. All tests were made using a 1N34A diode; other diode types might yield different results.
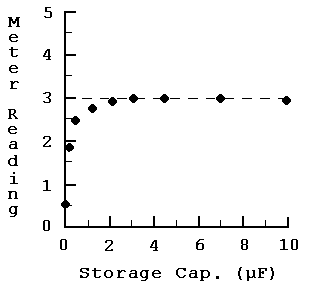
Figure 2. Modified WM-1 meter reading in "peak mode" as a function of storage capacitance for the word "pop".
Modifying the output circuit of the WM-1/WM-2 as shown in Figure 1 is not difficult, although it does require that some minor surgery be performed on the PC board. I also made two other simple WM-1 modifications which you might find useful: I added a "power on" indicator and provisions for external DC power.
I found that many small LED's will operate satisfactorily at 1 to 2mA, and installed one on the front panel of the WM1 connected through a 4.7K resistor to pin 4 of rotary switch S2. Since a maximum of 4mA is drawn by the WM1 during operation, you don't want to use a current hungry pilot lamp that will quickly kill the internal 9V battery!
In order to allow use of an external source of DC power, I added a 2.5mm DC power jack and SPDT switch on the back panel above the battery holder. I used an LM78L09 voltage regulator, as shown in Figure 3, to allow any source of DC between about 11V and 24V capable of supplying at least 10mA to be used. The voltage regulator and two bypass capacitors were mounted "spider web" style on the back of the power jack.

Figure 3. External power input circuit.
The "peak power" modification can be made as follows:
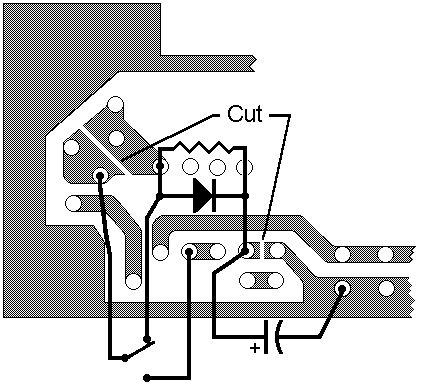
Figure 4. Partial bottom view of WM-1 PC board showing modifications to be made. NOTE: Board layout may vary due to production changes and does not apply to the WM-2.
You now have a peak reading QRP wattmeter! This modification does not
affect meter calibration, but you should go through the calibration
procedure in the manual anyway since you might have moved one of the pots
while handling the PC board. Check the difference in meter readings when
switching between "normal" and "peak" while operating SSB – you will be
amazed!
————
Copyright © 2005, 2012 by Larry East, W1HUE ————
Page last updated on June 17, 2012